
Hello everyone, today’s topic will continue from the last topic about the installation of Magento Data Migration Tool. Magento Data Migration Tool is a very prominent tool used for migrating data, settings and incremental changes to Magento 2. Just follow the steps before migrating and remember the Important rules for successful migration so you can begin the process of migration to transfer everything from your old Magento website.
Take the first move to run Data Migration Tool
Now we will discuss about how to migrate settings, data and incremental changes, but first you will need to take these steps:
- Log in to Magento server as a user who has permissions to write to the Magento file system, this step is performed many times before so you maybe skip it. Or you can easily switch to the Magento file system owner.
- Add <your Magento install dir>/bin to your system PATH to run Magento commands from the directory you installed Magento. Because shells have different syntax, which bash shell example for CentOS can be referred like:
export PATH=$PATH:/nas/content/live/magestoredev/magento2/bin
However, you can run the commands in other ways:
_ Run ./magento <command name> in cd <your Magento install dir>/bin
_ Or in php <your Magento install dir>/bin/magento <command name>
You should understand the command syntax of
bin/magento migrate:<mode> [-r|–reset] {<path to config.xml>}
with <mode> is settings, data, or delta
{<path to config.xml>} is the exact system path for the file config.xml; so this argument is mandatory.
[-r|–reset] is an optional argument that starts migration from the beginning used for testing migration.
Okay, let’s move to the process of migration data, settings and incremental changes.
Settings migration – first of the process of migration to Magento 2
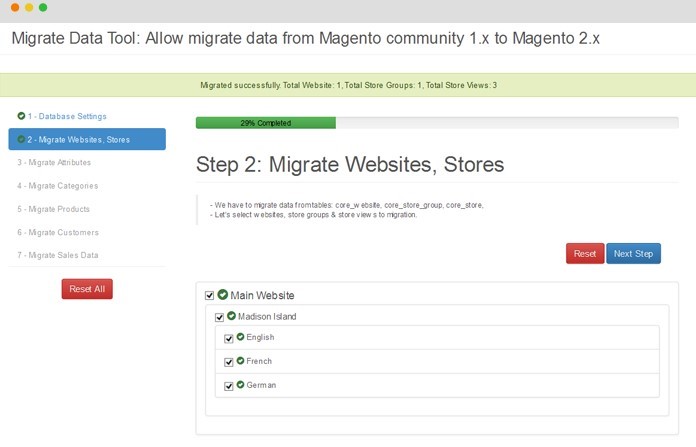
The process of migration settings is taking first and this mode will migrate stores; websites; and different system configuration like shipping, payment, some tax settings etc to new Magento 2. This process of how settings are migrated is described below:
1, Open the directory:
`<your Magento 2 install dir>/vendor/magento/data-migration-tool/etc/<migration edition>/<ce or version>
2, To create settings.xml from the provided sample enter the command:
cp sample.xml.dist sample.xml
3, Create your changes in settings.xml.
4, Make changes to the <settings_map_file> tag in <ce or ee version>/config.xml so you can specify the new name of file settings.
Data migration – the core in Migration process
The next step will be considered as the most important as you will migrate the data. During the process of data migration, Data Migration Tool will verify what tables and fields are the same between Magento and Magento 2. But in case it can not verify that, there will be an error displayed a list of trouble tables and fields. This problem maybe cause by the extensions which have not been updated in Magento 2 database.
There are two possible ways when you encounter this error displays:
_ Install the possible Magento 2 extensions and postpone the unavailable.
_ Ignore the error displays by adding <ignore> tags to the map.xml file.
Then you can run the Data Migration Tool again.
Incremental changes migration
Data Migration Tool also allows you to migrate the changes made in Magento 1, it can be since the last time you migrated data between Magento 1 update and added through the store by your customers.
Data that must be manually migrated to Magento 2
Media files on the file system and the database
All media files such as images for products, categories, the WYSIWYG editor should be migrated manually from <your Magento 1 install dir>/media to <your Magento 2 install dir>/pub/media.
Except the files .htaccess located in the Magento 1 media folder because Magento 2 has its own .htaccess that should not be replaced.
Storefront design
_ Manually copy the location and format of design in files (css, js, templates, XML layouts).
_ Layout Updates is also stored in database and placed through Magento 1 Admin in CMS Pages, CMS Widgets, Category Pages and Product Pages.
ACLs (Access Control Lists)
_ All credentials for web services APIs (that is SOAP, XML-RPC, and REST) must be manually recreated.
_ All administrative users and associate them with access privileges must be manually recreated, too.
After completing your migration and fully testing with your new Magento 2 site, you should perform the following tasks:
- Put Magento 1 in maintenance mode.
- Permanently stop all Admin activities of Magento 1.
- Start new Magento 2 cron jobs and flush all Magento 2 cache types.
- Reindex Magento 2.
- Change DNS, load balancers, and point to Magento 2 production hardware.
The process of migration Magento 2 is the most important part which need to be done correctly. Using Data Migration Tool, this process can be done much easier without any unacceptable faults. However the process after the migration is also much vital, and you must read our guide thoroughly.
-> The first topic about the requirements of migration to Magento 2 can be found here.
-> The previous topic about the installation of Magento Data Migration Tool in case you need it.
-> Next topic will be about How to migrate Magento to new server.
")

