Hello,

It’s such a long time since our last meeting on Tutorial section, isn’t it?

I’m Alex and today I will introduce the next issue of Magento Tutorial which is called Lesson 9: Magento Form in Backend.

The required duration for this lesson is 2 hours. It includes 3 sub-issues:

  • Magento form and its elements in backend
  • Creating Magento form in backend
  • Actions in  Magento form (save, delete, save and continue edit)

After finish this lesson, you will know how to create Magento form in backend and customize the fields in the Magento form.

Now let’s begin part 1 with the two first sub-issues!

[yellowbox] Exclusive bonus: Rocket your sales by right segment, right target! Magento moduless and Magento 2 modules are powerful extensions for your web-store [/yellowbox]

1. Magento form and its elements in backend

Form admin allows user to enter and save data into the database. A magento form includes the following elements:

  • Form Container
  • Form tag
  • Form tabs
  • Form action button
  • Form fields

Below is how the Customer Information form looks:
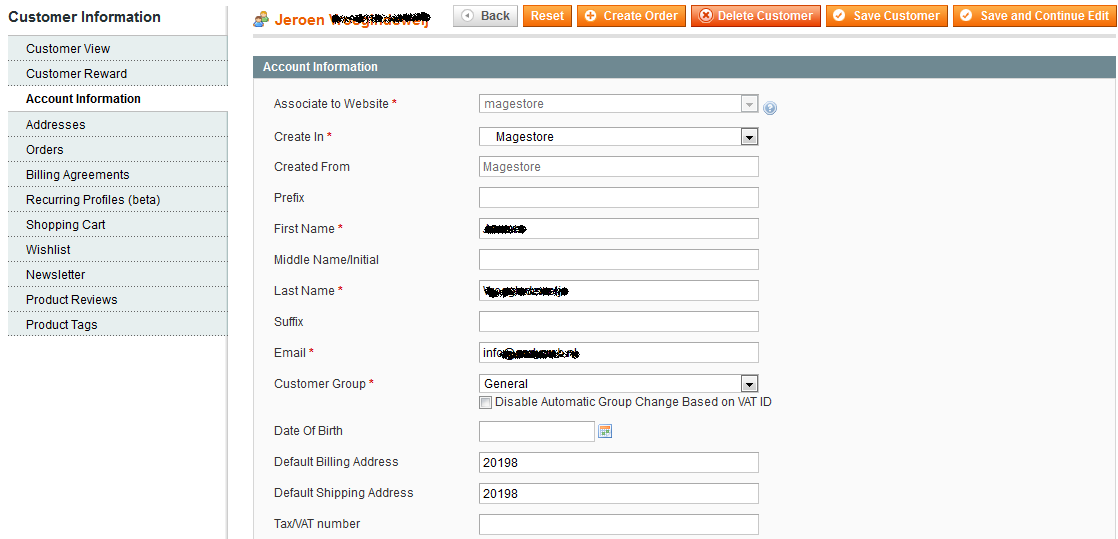
Magento Form in Backend


2. Create magento form in backend

2.1 Create action to display the magento form in backend

Add new item case
In the case we need to add new item, we should write function newAction() in the controller file:
app/code/local/Magestore/Lesson09/controllers/Adminhtml/Lesson09Controller.php

public function newAction(){
$this->loadLayout();
$this->_setActiveMenu('lesson09/items');
$this->_addBreadcrumb(Mage::helper('adminhtml')->__('Item Manager'), Mage::helper('adminhtml')->__('Item Manager'));
$this->_addBreadcrumb(Mage::helper('adminhtml')->__('Item News'), Mage::helper('adminhtml')->__('Item News'));

$this->_addContent($this->getLayout()->createBlock(' lession09/adminhtml_lession09_edit'))
->_addLeft($this->getLayout()
->createBlock('lession09/adminhtml_lession09_edit_tabs'));
$this->renderLayout();
}

In the other hand, we also can use a shot function as below. However, it’s can be used only when we had editAction() in this controller. Please look at the edit item case for better understanding.

public function newAction() {
$this->_forward('edit');
}

Edit item case
In the case we need to add some coding to load data from the database of the item to be edited

public function editAction() {
$id = $this->getRequest()->getParam('id');
$model = Mage::getModel('lesson09/lesson09')->load($id);

if ($model->getId() || $id == 0) {
$data = Mage::getSingleton('adminhtml/session')->getFormData(true);
if (!empty($data)) {
$model->setData($data);
}

Mage::register('lesson09_data', $model);

$this->loadLayout();
$this->_setActiveMenu('lesson09/items');

$this->_addBreadcrumb(Mage::helper('adminhtml')->__('Item Manager'), Mage::helper('adminhtml')->__('Item Manager'));
$this->_addBreadcrumb(Mage::helper('adminhtml')->__('Item News'), Mage::helper('adminhtml')->__('Item News'));

$this->_addContent($this->getLayout()->createBlock(' lession09/adminhtml_lession09_edit'))
->_addLeft($this->getLayout()
->createBlock('lession09/adminhtml_lession09_edit_tabs'));
$this->renderLayout();
} else {
Mage::getSingleton('adminhtml/session')->addError(Mage::helper('lesson09')->__('Item does not exist'));
$this->_redirect('*/*/');
}
}
[yellowbox]Exclusive information: Have you encouraged customers to shop with responsive Reward systemLet your customers feel that they are always rewarded and appreciated anytime visiting your store [/yellowbox]

2.2 Create blocks in magento backend

Form Container
The form container is, as the name suggests, the main div tag inside which all the form elements/html is placed. To create a form container you need to create a php file inside your Block/Adminhtml folder which extends Mage_Adminhtml_Block_Widget_Form_Container class. Let’s name our container file as Form.php
app/code/local/Magestore/Lesson09/Block/Adminhtml/Lesson09/Edit.php

class Magestore_Lesson09_Block_Adminhtml_Lesson09_Edit extends Mage_Adminhtml_Block_Widget_Form_Container
{
public function __construct()
{
parent::__construct();

$this->_objectId = 'id';
$this->_blockGroup = 'lesson09';
$this->_controller = 'adminhtml_lesson09';

$this->_updateButton('save', 'label', Mage::helper('lesson09')->__('Save'));
$this->_updateButton('delete', 'label', Mage::helper('lesson09')->__('Delete'));

$this->_addButton('saveandcontinue', array(
'label' => Mage::helper('adminhtml')->__('Save And Continue Edit'),
'onclick' => 'saveAndContinueEdit()',
'class' => 'save',
), -100);
}

public function getHeaderText()
{
return Mage::helper('lesson09')->__('My Form Container');
}
}

Note:
• getHeaderText(): This function return’s the Text to display as the form header. You can see the form header in the screenshot attached Admin Form Container.
• $this->_objectId: This variable is used in the form URL’s. This variable has the forms entity primary key, e.g the delete button URL would be module/controller/action/$this->_objectid/3
• $this->_blockGroup = ‘lesson09′; and $this->_controller = ‘adminhtml_lesson09′; they are very important, these variables are used to find FORM tabs file. i.e the path of the form tabs should be {$this->_blockGroup . ‘/’ . $this->_controller . ‘_’ . $this->_mode . ‘_form’}. The value of $this->_mode by default is ‘edit’. So the path of the php file which contains the form tag in our case would be ‘lesson09/adminhtml_lesson09_edit_form’.
• $this->_updateButton() and $this->_addButton() are used to update/add buttons to the form container. These buttons are visible in the screenshot Admin Form Container

Form Tag
This php file contains the actual

tag. It’s extended from Mage_Adminhtml_Block_Widget_Form. The full path of this file is:
app/code/local/Magestore/Lesson09/Block/Adminhtml/Lesson09/Edit/Form.php

class Excellence_Lesson09_Block_Adminhtml_Lesson09_Edit_Form extends Mage_Adminhtml_Block_Widget_Form
{
protected function _prepareForm()
{
$form = new Varien_Data_Form(array(
'id' => 'edit_form',
'action' => $this->getUrl('*/*/save', array('id' => $this->getRequest()->getParam('id'))),
'method' => 'post',
'enctype' => 'multipart/form-data'
)
);$form->setUseContainer(true);
$this->setForm($form);
return parent::_prepareForm();
}
}

Form Tabs
Magento Form in backend - Customer Information tabsIt’s used to add tabs to the form. Below are the tabs of the Customer Information form:The class of this php would be Magestore_Lesson09_Block_Adminhtml_Lesson09_Edit_Tabs, this is the block class we had used in our controller file. Its full patch is:
App/code/local/Magestore/Lesson09/Block/Adminhtml/Lesson09/Edit/Tabs.php

class Magestore_Lesson09_Block_Adminhtml_Lesson09_Edit_Tabs extends Mage_Adminhtml_Block_Widget_Tabs
{public function __construct()
{
parent::__construct();
$this->setId('form_tabs');
$this->setDestElementId('edit_form');
$this->setTitle(Mage::helper('lesson09')->__('Lesson09 Information'));
}
protected function _beforeToHtml()
{
$this->addTab('form_section', array(
'label' => Mage::helper('lesson09')->__('Item Information'),
'title' => Mage::helper('lesson09')->__('Item Information'),
'content' => $this->getLayout()->createBlock('lesson09/adminhtml_lesson09_edit_tab_form')->toHtml(),
));return parent::_beforeToHtml();
}
}

Form Fields
This block allows adding fields to the form. It’s extended from Mage_Adminhtml_Block_Widget_Form. Its full patch is:
app/code/local/Magestore/Lesson09/Block/Adminhtml/Lesson09/Edit/Tab/Form.php

class Magestore_Lesson09_Block_Adminhtml_Lesson09_Edit_Tab_Form extends Mage_Adminhtml_Block_Widget_Form
{
protected function _prepareForm()
{
$form = new Varien_Data_Form();
$this->setForm($form);
$fieldset = $form->addFieldset('lession09_form',array('legend'=>Mage::helper('lession09')->__('Item information')));$fieldset->addField('title', 'text', array(
'label' => Mage::helper('lession09')->__('Title'),
'class' => 'required-entry',
'required' => true,
'name' => 'title',
));$fieldset->addField('content', 'editor', array(
'name' => 'content',
'label' => Mage::helper('dochelp')->__('Content'),
'title' => Mage::helper('dochelp')->__('Content'),
'style' => 'width:700px; height:500px;',
'wysiwyg' => false,
'required' => true,
));if ( Mage::getSingleton('adminhtml/session')->getlesson09Data() )
{
$form->setValues(Mage::getSingleton('adminhtml/session')->getlesson09Data());
Mage::getSingleton('adminhtml/session')->setlesson09Data(null);
} elseif ( Mage::registry('lesson09_data') ) {
$form->setValues(Mage::registry('lesson09_data')->getData());
}return parent::_prepareForm();
}
}

We’ve added two fields into this form: title with text type (input text element) and content with editor type (textarea element).Note: Title and content are name of those attribute in database.
Below is the screenshot of form we’ve created:

Magento Form in Backend - created form fields

3. Actions in magento form

3.1. Save Action 

The Save action is written in the controller file:

app/code/local/Magestore/Lesson09/controllers/Adminhtml/Lesson09Controller.php

$model = Mage::getModel('lesson09/lesson09');
$model->setData($data)
->setId($this->getRequest()->getParam('id'));
try {
if ($model->getCreatedTime == NULL || $model->getUpdateTime() == NULL) {
$model->setCreatedTime(now())
->setUpdateTime(now());
} else {
$model->setUpdateTime(now());
}

$model->save();
Mage::getSingleton('adminhtml/session')->addSuccess(Mage::helper('lesson09')->__('Item was successfully saved'));
Mage::getSingleton('adminhtml/session')->setFormData(false);

if ($this->getRequest()->getParam('back')) {
$this->_redirect('*/*/edit', array('id' => $model->getId()));
return;
}
$this->_redirect('*/*/');
return;
} catch (Exception $e) {
Mage::getSingleton('adminhtml/session')->addError($e->getMessage());
Mage::getSingleton('adminhtml/session')->setFormData($data);
$this->_redirect('*/*/edit', array('id' => $this->getRequest()->getParam('id')));
return;
}
}
Mage::getSingleton('adminhtml/session')->addError(Mage::helper('lesson09')->__('Unable to find item to save'));
$this->_redirect('*/*/');
}

3.2. Delete Action 

The Delete action is also written in the controller file:

app/code/local/Magestore/Lesson09/controllers/Adminhtml/Lesson09Controller.php

public function saveAction() {
if ($data = $this->getRequest()->getPost()) {

public function deleteAction() {
if( $this->getRequest()->getParam('id') > 0 ) {
try {
$model = Mage::getModel('lesson09/lesson09');

$model->setId($this->getRequest()->getParam('id'))
->delete();

Mage::getSingleton('adminhtml/session')->addSuccess(Mage::helper('adminhtml')->__('Item was successfully deleted'));
$this->_redirect('*/*/');
} catch (Exception $e) {
Mage::getSingleton('adminhtml/session')->addError($e->getMessage());
$this->_redirect('*/*/edit', array('id' => $this->getRequest()->getParam('id')));
}
}
$this->_redirect('*/*/');
}

3.3. Save and Continue Edit Action

This action includes two sub-actions: save and then edit. It is not written in the controller and is just embedded in the Save Action with the code below:

if ($this->getRequest()->getParam('back')) {
$this->_redirect('*/*/edit', array('id' => $model->getId()));
return;
}

We can see the “Save and Continue Edit” button is embedded in the Container Form with the code:

$this->_addButton('saveandcontinue', array(
'label' => Mage::helper('adminhtml')->__('Save And Continue Edit'),
'onclick' => 'saveAndContinueEdit()',
'class' => 'save',
), -100);
}

This command has added the param “back” into save url. So after saving the data, we will be redirected to the edit action.

To know more about input types which can be created in form such as option, datetime, file, image, checkbox, etc.).

We will update Magento tutorials regularly, especially about Magento 2. Let’s subscribe to our blog to be the first one catch up with the latest news by leaving your email below.

Follow us in Magento Open Course for Magento Tutorial.

Author

Alex is the CTO & Co-founder of Magestore which has been providing retail solutions for Magento merchants since 2009. He started as a Magento developer just one year after the release of the first version of Magento. With over 10 years experience of working with Magento and clients all over the world, he gained great knowledge on e-commerce development, order management systems, inventory control & retail POS.

Write A Comment