Hey guys, I am David and so glad to see you again at Lesson 11 of MageStore’s Magento Tutorial.
In this lesson, we will study how Magento Multiple Stores system in Magento works, the installation and configuration of a Magento website as well as the use of these configuration values in stores. This “Magento Configuration” lesson includes:
- Magento Multiple Stores system
- Add configurations to a Magento system
- Configure default values from code
- How to use/get configuration values from the system
We need 2 hours to finish this lesson.
1. Magento Multiple Stores system
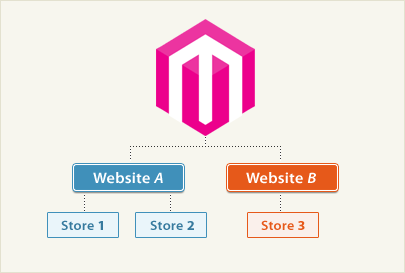
One of Magento’s advanced features is that it allows managing multiple websites and stores within one installation, and we have an amazing system to support this: GWS – aka “Global, Website, Store.”
Global: This refers to the entire installation.
Website: Websites are ‘parents’ of stores. A website consists of one or more stores. Websites can be set up to share customer data, or not to share any data.
Store (or store view group): Stores are ‘children’ of websites. Products and Categories are managed on the store level. A root category is configured for each store view group, allowing multiple stores under the same website to have totally different catalog structures.
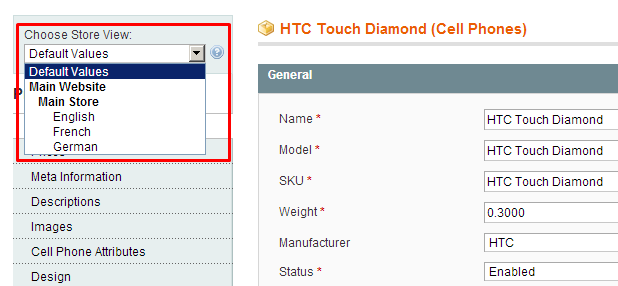
Store View: A store needs one or more store views to be browse-able in the front-end. The catalog structure per store view will always be the same, it simply allows for multiple presentations of the data in the front. 90% of implementations will likely use store views to allow customers to switch between 2 or more languages.
When managing data in backend, we have a dropdown box to switch between store views.
2. Add configurations to Magento system
Magento is an exclusive configuration system for all the module running on it. Adminstrator do these configurations by accessing System => Configuration. On this page, we will view a configuration form, with a dropdown box to switch between websites and store views.
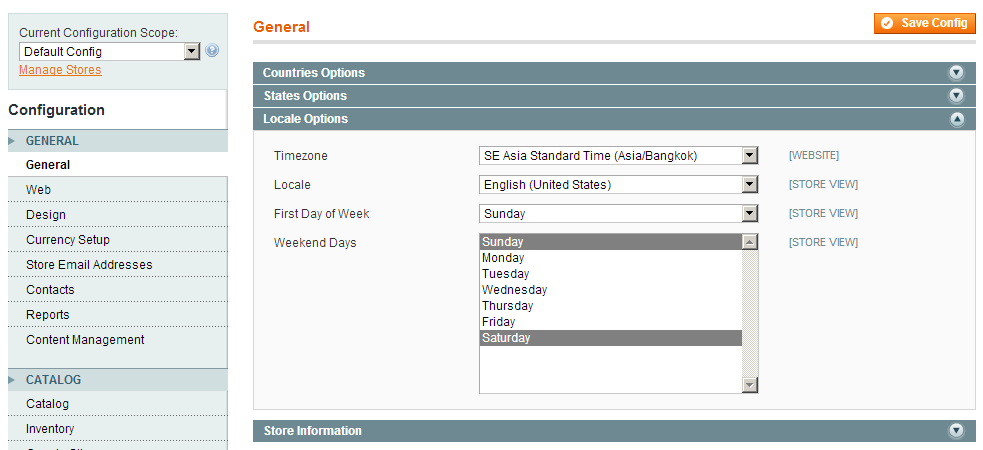
Magento get these system configuration forms from system.xml files in etc folers of all working modules. As a result, to add configurations to the Magento system, we need to add definition codes to this file.
First of all, we will create a module named Magestore_Lesson11 and edit file system.xml in the folder file app/code/local/Magestore/Lesson11/etc.
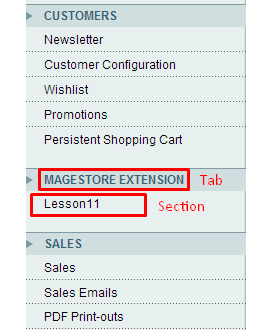
We start with add a Tab to the left navigation in the configuration list of Magento system.
<config>
<tabs>
<magestore translate="label">
<label>Magestore Extension</label>
<sort_order>400</sort_order>
</magestore>
</tabs>
</config>
– magestore: tab identify
– label: tab name
– sort_order: tab display order among all the tab of Magento
Then we will create a section for module configuration. We will add this piece of code into:
<config>
<tabs>
...
</tabs>
<sections>
<lesson11 translate="label" module="lesson11">
<class>separator-top</class>
<label>Lesson11</label>
<tab>magestore</tab>
<frontend_type>text</frontend_type>
<sort_order>299</sort_order>
<show_in_default>1</show_in_default>
<show_in_website>1</show_in_website>
<show_in_store>1</show_in_store>
</lesson11>
</sections>
</config>
– lesson11: section identify
– class: html class for the link to the section
– label: screen name of section lesson11
– tab: tab identify in which the section lies. Here, section lesson11 lies in tab magestore
– frontend_type: in Magento version 1.7.0.2, we can go without declaring this tag
– sort_order: the order display for this section, this matters when our tab has more than 1 section
– show_in_default: display this section in ‘default’ scope, i.e. the Global level stated above.
– show_in_website: display this section in ‘website’ scope. This matters when we reselect configuration scope (by switching from the dropdown) as website.
– show_in_store: display this section in ‘store view’ scope.
Now in configuration system, we can see:
 Next, we will add configurations to the elements of the configuration form:
<config>
<tabs>
...
</tabs>
<sections>
<lesson11 translate="label" module="lesson11">
...
<groups>
<general translate="label">
...
<fields>
<enable translate="label">
<label>Enable</label>
<frontend_type>select</frontend_type>
<sort_order>1</sort_order>
<source_model>adminhtml/system_config_source_yesno</source_model>
<show_in_default>1</show_in_default>
<show_in_website>1</show_in_website>
<show_in_store>1</show_in_store>
<comment></comment>
</enable>
</fields>
</general>
</groups>
</lesson11>
</sections>
</config>
We should pay attention to the following tab:
– enable: code of the field we will add
– frontend_type: the display type of the field configured on the form. Here we have such types as: select, multiselect, text, textarea, editor, file, image, label, radio, hidden… It is like when we create a field in a backend form. (in Lesson 10, remember?)
– source_model: the model used to provide data to a select or multiselect when we display on the form. In this example, we can see the file source model like this:
class Mage_Adminhtml_Model_System_Config_Source_Yesno
{
/**
* Options getter
*
* @return array
*/
public function toOptionArray()
{
return array(
array('value' => 1, 'label'=>Mage::helper('adminhtml')->__('Yes')),
array('value' => 0, 'label'=>Mage::helper('adminhtml')->__('No')),
);
}
}
– comment: to display notes right below the configurations we have added.
Besides, we can also declare other tags (if not, default values will be added.)
– frontend_model: the block to show the HTML code piece for our field. It is seen as a rederer for this field.
– backend_model: the model used to customize and change data when we save to database or get out data configured from database.
– depends: this field allows configuring whether to display it or not depends on another field value.
We will get a configuration form like this:

Or adding another field depends on this ‘enable’ field, we add these codes:
<fields>
<enable translate="label">
...
</enable>
<frontend_text translate="label">
<label>Frontend Text</label>
<frontend_type>text</frontend_type>
<sort_order>10</sort_order>
<show_in_default>1</show_in_default>
<show_in_website>1</show_in_website>
<show_in_store>1</show_in_store>
<comment>Comment for Frontend Text</comment>
<depends>
<enable>1</enable>
</depends>
</frontend_text>
</fields>
And get this configuration form:

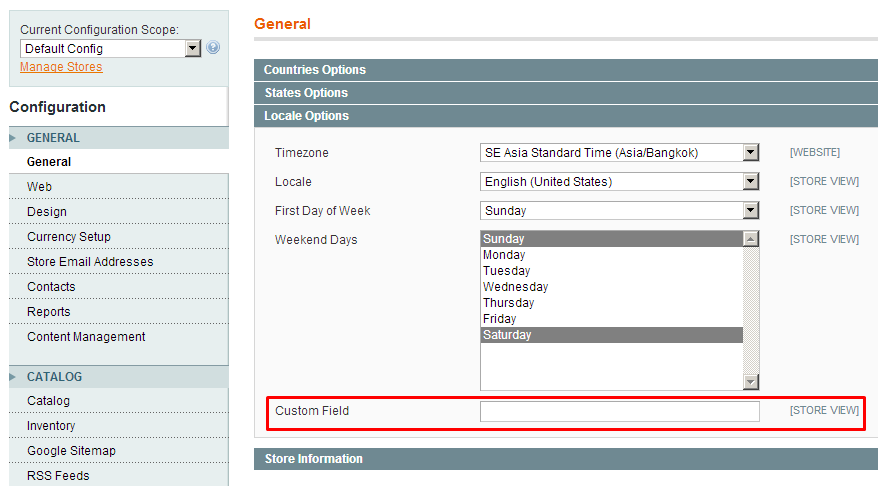
Besides, we can add fields to configuration forms available in Magento. To do this, we need to clarify the path to the section or group of that form. Let’s look at this example:
<config>
...
<sections>
<lesson11 translate="label" module="lesson11">
...
</lesson11>
<general>
<groups>
<locale>
<fields>
<custom_field translate="label">
<label>Custom Field</label>
<frontend_type>text</frontend_type>
<sort_order>100</sort_order>
<show_in_default>1</show_in_default>
<show_in_website>1</show_in_website>
<show_in_store>1</show_in_store>
</custom_field>
</fields>
</locale>
</groups>
</general>
</sections>
</config>
Here is what appears in the configuration form:
3. Configure Magento default values from code
In the above configuration forms, we have created the fields for admin to configure their values. However, if he has not configured yet, we need Magento default values so that the modules can work well for our programming purposes.
To configure these Magento default values, we need put some code into the file config.xml in the same directory with the file system.xml. Add the code like this:
<config>
...
<default>
<lesson11>
<general>
<enable>1</enable>
<frontend_text>Global Frontend Text</frontend_text>
</general>
</lesson11>
</default>
</config>
– default: the value scope of the configuration. ‘default’ is equivalent to Global. Besides we can use other tags such as websites, stores, with which we need more information about the website (website code) or the store (store code)
– lesson11: the section code in the above configuration
– general: the code group in the above configuration
– enable: the code field in the above configuration
The configuration form will look like this:

Or to add default configuration for the store view ‘German’ only:
<config>
...
<default>
<lesson11>
<general>
<enable>1</enable>
<frontend_text>Global Frontend Text</frontend_text>
</general>
</lesson11>
</default>
<stores>
<german>
<lesson11>
<general>
<frontend_text>German Frontend Text</frontend_text>
</general>
</lesson11>
</german>
</stores>
</config>
Then we will have the default configuration for the store view ‘German’ only.

4. How to use/get configuration values from the system
With the above configuration, we will use the value configured by Admin for our activities in our module.
To get the configuration values, we will use the following method
Mage::getStoreConfig($path, $store = null)
– path: the path to the configuration, in form of [section_code]/[group_code]/[field_code] – store: the store we want to get the configuration from. If it is null, the Magento system will get the configuration value from the current store on which the system is running.
For example, we call the function:
Mage::getStoreConfig('lesson11/general/frontend_text');
// Result: ‘Global Frontend Text’
Besides, if the path is not full to field_code, the returned value will be a value array of the configuration field.
Mage::getStoreConfig('lesson11/general');
// Array(
//      'enable' => 1
//      'frontend_text' => 'Global Frontend Text'
// )
Moreover, we can also use the configurations to trigger the menu display in backend or to perform an action from the file layout of the template. We can add it into the file adminhtml.xml in the same directory with the file system.xml like this:
<config>
<menu>
<lesson11 module="lesson11" translate="title">
<title>Lesson11</title>
<sort_order>71</sort_order>
<depends>
<config>lesson11/general/enable</config>
</depends>
<children>
...
</children>
</lesson11>
</menu>
...
</config>
Here, we declare in the depends/config tag. As a result, when we configure Enable as ‘Yes’, a menu will be displayed like this.

If we configure Enable as ‘No’, it will no longer be displayed in the menu bar.

Summary
In this lesson, we have learned how to work with the configuration system in Magento including adding, configuring values for store and using these values for programming. We need this part in almost any module development as it enable creating different options for module users.
Moreover, because configuration use form to get information form users, you can refer Lesson 9 and Lesson 10 to learn more about forms.
See you again next time in Lesson 12 of Magento Open Course.


