Howdy friends,
Today we will continue our 3 hours of Magento Tutorial to learn about Grid on Magento Frontend. There are 4 main parts:
- Introduction about Grid Magento
- Steps to create a Magento grid
- Write gird template
- Grid pagination
1. Introduction about Magento Grid
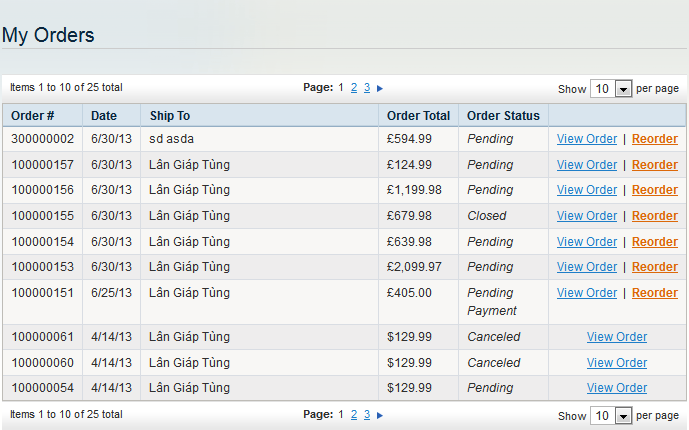
Here is the example of grid, which is a page displays list of orders when you sign in a Magento account

In order to create a Magento grid, you can try to get the data and display it in a common php table. However it will take you a lot of time and effort to configure the template as well as to paginate later. That is the reason why in this lesson, I would like to briefly introduce you how to create a standard grid with available support from Magento.
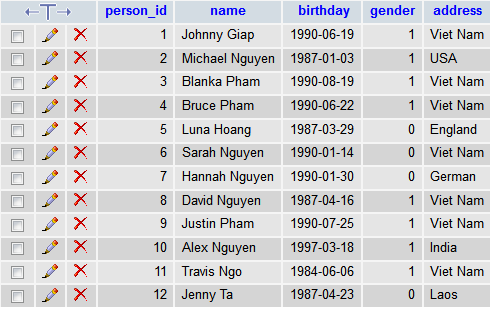
For example, after installing magento and creating a new module named Lesson13, we will build a database table (table lesson13) with the fields: person_id, name, birthday, gender, and address with the following information (in phpMyAdmin)

Model corresponding to this table is Lesson13/Model/Lesson13.php
Note: Ways to configure Model & database has been mentioned in Lesson 5.
2. Steps to create a Magento grid
As mentioned in Lesson 12, we need 4 steps to buid a template on frontend:
Step 1: Create a layout for action index: app/design/frontend/default/default/lesson13.xml
<layout version="0.1.0">
<default>
<!-- update layout for all frontend page -->
</default>
<lesson13_index_index>
<reference name="content">
<block type="lesson13/lesson13" name="lesson13" template="lesson13/lesson13.phtml" />
</reference>
</lesson13_index_index>
</layout>
Step 2: Create controller/Action: indexAction() in file app/code/local/Magestore/Lesson13/controllers/IndexController.php
class Magestore_Lesson13_IndexController extends Mage_Core_Controller_Front_Action
{
/**
* index action
*/
public function indexAction()
{
$this->loadLayout();
$this->renderLayout();
}
}
Step 3: Create Block Lesson 13 in file: app/code/local/Magestore/Lesson13/Block/Lesson13.php
class Magestore_Lesson13_Block_Lesson13 extends Mage_Core_Block_Template
{
/**
* prepare block's layout
*
* @return Magestore_Lesson13_Block_Lesson13
*/

public function __construct()
{
parent::__construct();
$collection = Mage::getModel('lesson13/lesson13')->getCollection();
$this->setCollection($collection);
}
}
Step 4: Create file template: app/design/frontend/default/default/template/lesson13/lesson13.phtml
File template will display all HTML paragraphs which we want to show out on frontend.
3. Writing templates for grid
In this section we will go into details: How the rows and columns are shown in the grid as described above.
<!-- Page Title -->
<div class="page-title">
<h2><?php echo $this->__('Lesson13 Module Grid Template') ?></h2>
</div>
<table id="my-person-table" class="data-table">
<colgroup>
<col width="1">
<col>
<col width="1">
<col width="1">
<col>
</colgroup>
<thead>
<tr class="first last">
<th><?php echo $this->__('No.')?></th>
<th><?php echo $this->__('Name')?></th>
<th><?php echo $this->__('Birth Day')?></th>
<th><?php echo $this->__('Gender')?></th>
<th><?php echo $this->__('Address')?></th>
</tr>
</thead>
<tbody>
<?php foreach($this->getCollection() as $person): ?>
<tr>
<td><?php echo $person->getData('person_id')?></td>
<td><?php echo $person->getData('name')?></td>
<td><?php echo Mage::helper('core')->formatDate($person->getData('birthday'))?></td>
<td><?php echo $person->getData('gender')?></td>
<td><?php echo $person->getData('address')?></td>
</tr>
<?php endforeach ?>
</tbody>
</table>
An information table will be displayed in the code above. In this code, we should pay attention to this function:
Mage :: helper ('core') -> formatDate ($ person-> getData ('birthday'))
This function can convert form of date in the database according to “currently locales” of store in config setting. In addition to formatDate function, there are a lot of other functions for coverting data into standard format which are written in: app/code /core /Mage/Core /Helper/Data.php
The result will be
Currently, rows in the above table are very difficult to distinguish from each other. That’s why Magento is available to support a javascript function to differentiate the rows color. Here is the code:
<script type="text/javascript">decorateTable('my-person-table')</script>
In which ‘my-person-table’ is ID of the table.
The result will be:
4. Grid pagination
For the tables with large amount of data/rows, we need to paginate for grid. In Magento, there is no need for great effort to calculate the number of rows, pages with normal php functions, we just need to go through some basic steps:
- Insert /app/code/core/Mage/Page/Block/Html/Pager.php to create a sub-block of block lession 13, which is already configured, and then name it (for example: lesson13_pager)
<layout version="0.1.0">
<default>
<!-- update layout for all frontend page -->
</default>
<lesson13_index_index>
<reference name="content">
<block type="lesson13/lesson13" name="lesson13" template="lesson13/lesson13.phtml" >
<block type="page/html_pager" name="lesson13_page"/>
</block>
</reference>
</lesson13_index_index>
</layout>
- Rewrite 2 function in blog: _prepareLayout() và getPagerHtml()
app/code/local/Magestore/Lesson13/Block/Lesson13.php
public function _prepareLayout()
{
parent::_prepareLayout();
$pager = $this->getLayout()->createBlock('page/html_pager', 'lesson13.pager')->setCollection($this->getCollection());
$this->setChild('pager', $pager);
return $this;
}
public function getPagerHtml()
{
return $this->getChildHtml('pager');
}
- Add paging
app/design/frontend/default/default/template/lesson13/lesson13.phtml
<!-- Page Title -->
<div class="page-title">
<h2><?php echo $this->__('Lesson13 Module Grid Template') ?></h2>
</div>
<?php echo $this->getPagerHtml() ?>  <!--Add Paging-->
<table id="my-person-table" class="data-table">
……
</table>
<?php echo $this->getPagerHtml() ?> <!--Add Paging-->
<script type="text/javascript">decorateTable('my-person-table')</script>
The result will be:
Enjoy coding and see you later. Follow us in Magento Open Course for Magento Tutorial.


