NOTE: This post is about Magento 2 theme development!
Hey guys, how much knowledge you have accumulated for Magento 2 theme development? Anything you want to share? For me, there are many interesting features I’ve found in Magento 2 that I have already packed in this topic. In our Blog, we also write an article for who don’t have enough time to write a Magento 2 themes. Instead, they’ll want to choose a premium (and free) built by well-known brands in Magento field. Take a look if you’re one of them.
Whoever you are an extension or theme developer, you should spend time reading this blog post because you’ll understand more about theme and template structure in Magento 2.
 Create a Magento 2 Theme step-by-step
Free resource for you:
How to Install Magento 2 on Localhost via XAMPP
How to create a simple Magento 2 module
Magento plugins/ Magento 2 plugins
In case you still have problems with this guide, you can hire Magento developer to help you out.
I will divide this tutorial into 2 parts. The part one in today’s post is about primary elements in Theme package. Part 2 will reveal how to customize the theme in Magento 2.
Let’s go! How to create Magento 2 theme in eyes blink!
1. Fundamental elements in Theme package
a. Magento 2 theme structure
To begin with Magento 2 theme development, you may want to know the detail of Magento 2 theme structure, thus I will show you the Magento 2 theme structure in the most simple and visual way:
MVC structure in Magento 2 is clearer than in Magento 1.x. Modules in Magento 2 will also be added View element in the module folder structure. Catalog module: app/code/Magento/Catalog/ is an example for you.
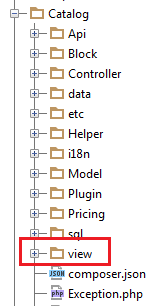
Please pay attention to View element which is in the same position with Controller, Model. In the View folder, there are below elements:
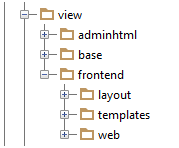
We can see that the inside structure has 3 elements, in which base element is moved out from <area>. The folder structure in <area> folder includes layout, templates, web. For example, frontend has 3 fundamental folders

+ In Magento 2 theme structure, layout folder contains all the layout file of module (similar to layout file of Magento 1.x which is contained in all layout folders of theme). The code of these layouts, of course, have different structure. I will write in details in the specific part for layout file below.
+ Template folder has all template.phtml file, which is file rendered into html as we know in Magento 1.x, inside code is not very different, just php code mixes with html code.
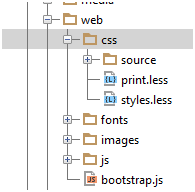
+ Web folder is a totally new folder in Magento 2. You can see the image below to understand new structure in Magento 2 theme:
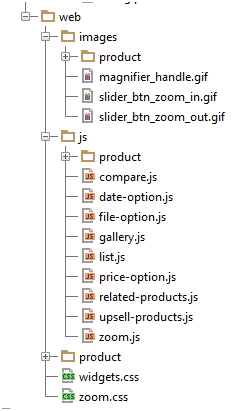
Let’s take a look at child folder and the files inside! We can realize that here is where css – stylesheet, js, media – images (that are called elements to make website appearance better-looking) are grouped. It replaces for 3 folders: css, images, js in previous skin/frontend/base/default. In other words, in Magento 2, the old skin folder is removed and divided into elements in each module, which makes the module more independent.
Above is a simple way to understand Magento 2 theme structure with Magestore, it’s easy right?
b. Magento 2 theme layout
How about Magento 2 theme layout? What is the different between theme layout in Magento 2 and Magento 1.x?
In Magento 2, each module has a default layout which can be overwritten and expanded by another layout.
Eg: app/code/Magento/Catalog/view/frontend/layout/default.xml
Magento 2 separates layout files into particular handle
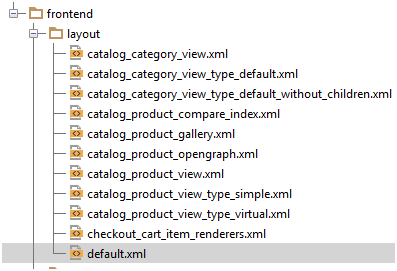
Handle declaration is nearly the same as the previous rule:
catalog_product_view – is a handle according to module and controller action
The definition for page we want to apply the layout is more specifically by declaring
catalog_product_view_type_simple_id_128
Or we can call to include other handles
Here is the example about layout file position of Catalog module:
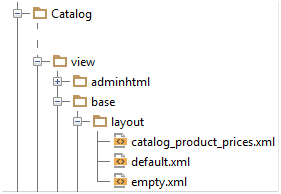
There are 2 types of layouts in module, including Base layout and Theme layout
+ Base layout in Magento 2 theme is a default layout area of each module. It’s not recommended to edit in these layout files if it’s not your custom module.
Eg:
app/code/Magento/Checkout/view/frontend/layout/checkout_cart_item_renderers.xml
| __app/code/<Namespace>/<Module>|__/view|__/<area>|__/layout|–<layout_file1>.xml|–<layout_file2>.xml |
+ Theme layouts in Magento 2 is the theme outside the module, allowing customizing default layout of module by reporting corresponding <Namespace>_<Module> in theme folder
Eg:
app/design/frontend/Magento/blank/Magento_Checkout/layout/

To create a layout file in Magento 2 theme, follow the rules:
- Each layout file calls for one handle and others called
- Name of layout file is the name of handle layout. Eg: checkout_cart_index
- Layout file called is in layout folder
- Eg:
<layout xmlns:xsi="http://www.w3.org/2001/XMLSchema-instance">
<update handle="page_one_column" />
   <referenceContainer name="content">
   <!-- ... -->
   </referenceContainer>
</layout>
The order to read and process layout files is described as below:
- If layout file belongs to different module, the order to run will be: independent module, dependent module and then alphabetical order of file name.
- If file belongs to the same module, the order will be alphabetical order of file name
The steps to proceed layout of the system:
- Read the group of all default layout files (base), including dependent ones
- Determine the order of inherited or overwritten files
- Add all expanded layout, replace layout in base, get in parent layout, replace parent layout files which are overwritten by the child ones
Here is the model of processing layout
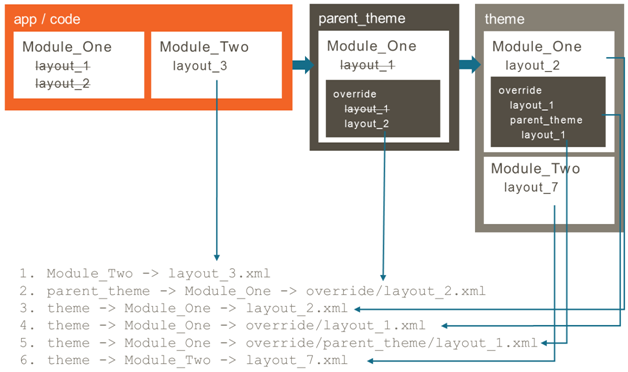
It can be seen that layout files are overwritten from the top down, the parent theme overwrites base theme of module, the child theme (the theme we often customize) overwrites the parent one.
Eg:
The file layout_2 of module Module_One is declared in the parent theme parent_theme in override folder. Thus, instead of the layout Module_One > layout_2.xml, the system will use the file parent_theme > Module_One > override > layout_2.xml
Therefore, if you want to customize the element of layout, by these rules above, you can easily copy to the structure of the child theme to rewrite the layout files.
Layout/Block Areas:
Similarly to Magento 1.x, it is divided into the fundamental layout areas:
+ Container: The area to distribute page elements
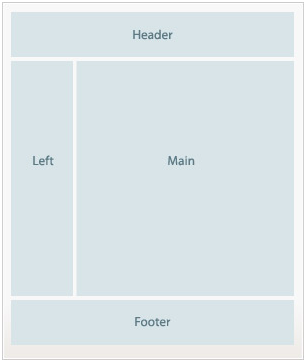
+ Block: the area where default block elements of Magento are in container
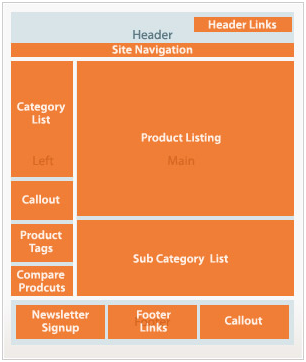
The sample of layout content:
<container name="container.1" label="Container 1"
as="container_1" output="1" htmlTag="div" htmlId="container-1"
htmlClass="container">
<block class="Magento\Module\Block\Class" name="block.1">
<container name="child.container" label="Child Container" as="child">
<block type="Magento\Module\Block\Class" name="block.2">
</container>
<block class="Magento\Module\Block\Class" name="block.3"/>
</container>
<container name="container.2" as="container_2" htmlTag="div"
htmlId="container-2" htmlClass="container"/>
Above is a simple view about Magento 2 theme layout.
c. Introduction about new language style – LESS
In Magento 2 theme development, before we can customize and create Magento 2 theme , we need to learn about the new language style – LESS. This language is interesting in Magento 2.
LESS is added as higher-level than CSS because there are many advanced features. It is translated into CSS thanks to LESS library in php. We’re still allowed to add CSS URL in the source to use directly.
Use via LESS:
The pre-process LESS language in Magento 2 is through library in lib/internal/Magento/Css/PreProcesso.
The way to import in LESS file
file.less
| @magento_import “<some_id>”; |
| @import “path/to/dir1/some_file”;@import “path/to/file/file1.less”;@import “path/to/file/file2.less”; |
Go here to understand more about LESS language: http://lesscss.org/ or http://less.eten.vn/
The structure of default LESS library folder is imported
lib/web/
├── css/
│ ├── docs/ (Library documentation)
│ ├── source/
│ │ ├── lib/ (Library source files)
│ │ │ ├── abstract.less
│ │ │ ├── actions-toolbar.less
│ │ │ ├── breadcrumbs.less
│ │ │ ├── buttons.less
│ │ │ ├── dropdowns.less
│ │ │ ├── forms.less
│ │ │ ├── icons.less
│ │ │ ├── layout.less
│ │ │ ├── lib.less
│ │ │ ├── loaders.less
│ │ │ ├── messages.less
│ │ │ ├── navigation.less
│ │ │ ├── pages.less
│ │ │ ├── popups.less
│ │ │ ├── rating.less
│ │ │ ├── resets.less
│ │ │ ├── responsive.less
│ │ │ ├── sections.less
│ │ │ ├── tables.less
│ │ │ ├── tooltips.less
│ │ │ ├── typography.less
│ │ │ ├── utilities.less
│ │ │ └── variables.less
│ │ └── theme.less
│ └── styles.less
├── fonts/
│ └── Blank-Theme-Icons/ (Library custom icons font)
├── images/
│ └── blank-theme-icons.png (Library icons sprite)
└── jquery/ (Library javascript files)
d. Mage_page element
The last thing about Magento 2 theme development is The Mage_page element in the previous Magento version is replaced by Mangento_Theme module.
2. Configure and create a theme folder
- Create a theme folder in design folder as the structure below: app/design/<area>/<vendorName>/<newTheme>/
Example: /app/design/frontend/Magento/magestore
- Declare theme:
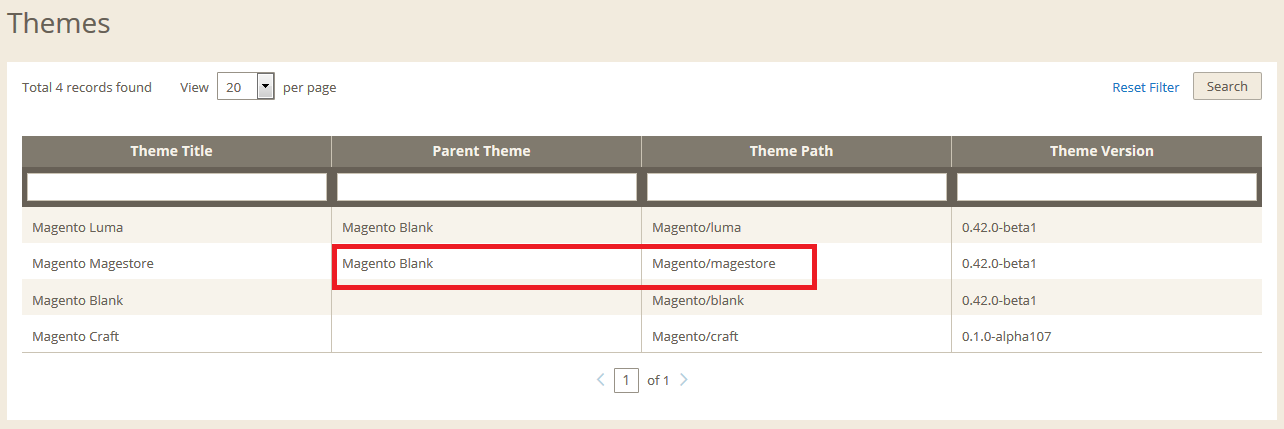
Create a file theme.xml in Magestore theme folder that you’ve just created and declare information including: theme, version, parent theme (if it is a inherited theme)
<theme xmlns:xsi="http://www.w3.org/2001/XMLSchema-instance"xsi:noNamespaceSchemaLocation="../../../../../lib/internal/Magento/Framework/Config/etc/theme.xsd">
<title>Magestore Theme</title>
<media>
<preview_image>media/preview.jpg</preview_image>
</media>
</theme>
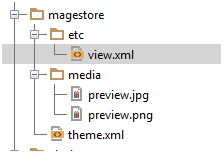
Create a photo to preview for the new theme: magestore.png
Example:
We have a photo file as follows:
/app/design/frontend/Magento/magestore/media/theme/preview/magestore.png
Otherwise, there will be an error alert for not finding photos.
- Create a file composer.json in the theme folder
{
    "name": "magento/theme-frontend-blank",
    "description": "N/A",
    "require": {
        "php": "~5.4.11|~5.5.0",
        "magento/framework": "0.42.0-beta1",
        "magento/magento-composer-installer": "*"
    },
    "type": "magento2-theme",
    "version": "0.42.0-beta1",
    "license": [
        "OSL-3.0",
        "AFL-3.0"
    ],
    "extra": {
        "map": [
            [
                "*",
                "frontend/Magento/blank"
            ]
        ]
    }
}
- In backend, go to Content > Design > Themes to see the new theme
- Configure Images (Optional)
In the file view.xml, the size of product photos in frontend will be configured.
In the new theme folder, the new folder <etc> is just created
app/design/<area>/<vendorName>/<newTheme>/etc/
Example: /app/design/frontend/Magento/magestore/etc/
Copy view.xml file in the default theme folder to the <etc> folder
In file view.xml, the display setting in frontend may be configured.
Example: Configure the grid of a product to reduce the pixel of a product’s image down to 120px
<var name="new_products_content_widget_grid:type">small_image</var>
<var name="new_products_content_widget_grid:width">120</var>
<var name="new_products_content_widget_grid:ratio">1</var>
<var name="new_products_content_widget_grid:height">120</var>
- Create an image folder:
In the theme, there are some static folders need to be added to the image folder
Create folder <web> and folder <image> in the folder <web>
App/design/<area>/<vendorName>/<newTheme>web/images/
Example: /app/design/frontend/Magento/magestore/web/images/
- Add a logo image to the theme:
Go to: app/design/<area>/<vendorName>/<newTheme>web/images/
Example: /app/design/frontend/Magento/magestore/web/images/
Copy the image with the name logo.png to the folder:
Example: logo.png
Magento will automatically set file logo.gif as the logo image. If you don’t want it automatically, then create the following file:
Find and copy the file /Magento_Theme/layout/default.xml in the default theme to the folder app/design/<area>/<vendorName>/<newTheme>/
There will be the following path:
/app/design/frontend/Magento/magestore/Magento_Theme/layout/default.xml
Add this code to the file:
<referenceBlock name="logo">
<arguments>
<argument name="logo_file" xsi:type="string">images/logo.png</argument>
</arguments>
</referenceBlock>
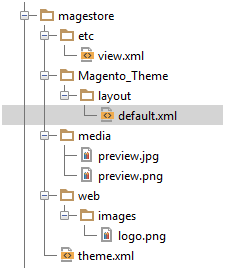
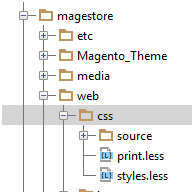
As a result, you will have a theme structure as follows:
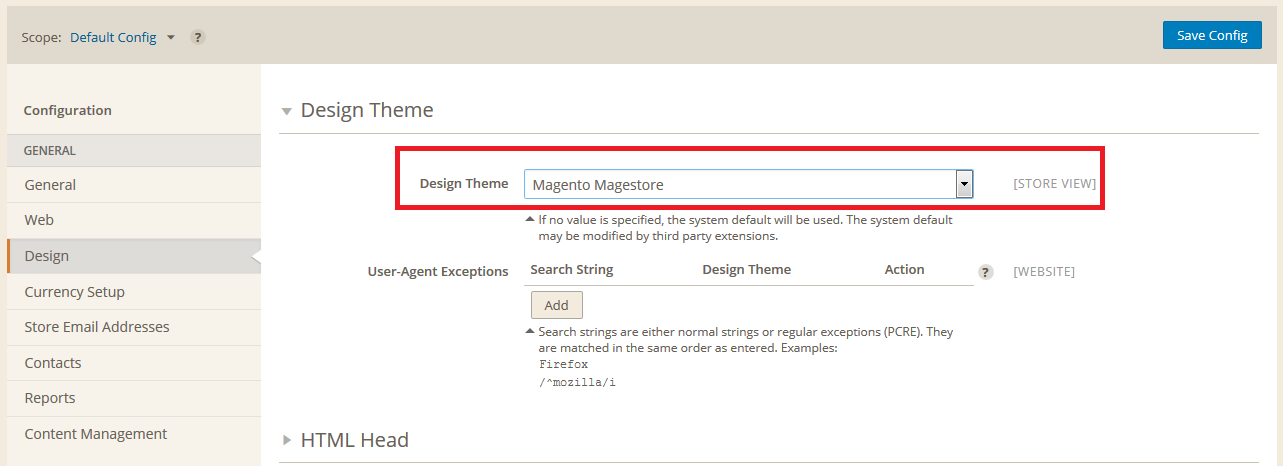
- Go to Configuration then use the theme you just created:
Go to Store > Configuration > Design in Design Theme, choose the new theme:
Then Save Configuration.
So we have finished creating a new theme folder structure, the following part will be steps to customize your own theme. Let’s move!
3. Fundamental elements customization
- Customize CSS:
In order to customize CSS , copy files that are inherited from parent theme or from the default theme to your theme folder.
Example: Go to theme folder /app/design/frontend/Magento/blank, copy the folder web/css
Then paste to your theme folder /app/design/frontend/Magento/magestore/web
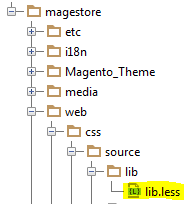
Go to the folder /lib/web/css/source/lib copy the file lib.css then go to lib folder in Magestore theme
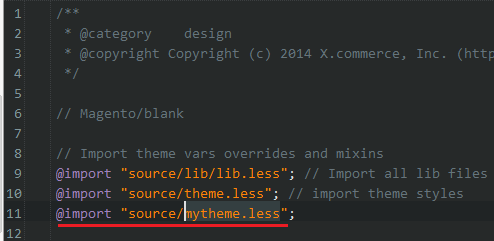
In the folder app/design/frontend/Magento/magestore/web/css/ , open the file style.less, then edit code as follows:
After that, create a file mytheme.less in the source folder:
We have a file path:
app/design/frontend/Magento/magestore/web/css/source/mytheme.less
Insert the following code (code in LESS language)
body {
  margin: 0px!important;
  padding: 0px!important;
}

.page-wrapper {
  background-color: #333;
}


.mycustom-class {
  color: red;
}
After deleting static folder and <var cache> folder
/pub/static/frontend/Magento/magestore
/var
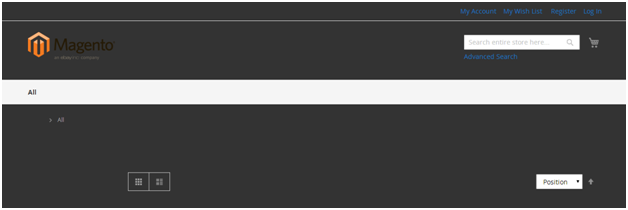
Refresh your browser and we have background web color:
Later, if you want to edit something, just do the same as you did with css above.
- Customize template module:
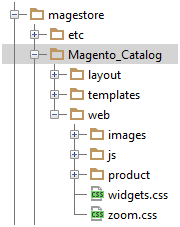
You can also customize any module’s html, for example, if you want to customize frontend of module Magento_Catalog, go to the folder app/code/Magento/Catalog/view/frontend/ of the module, copy folders: layout, templages, web to your new theme, place them in folder Magento_catalog with the same name as the module’s name, as below:
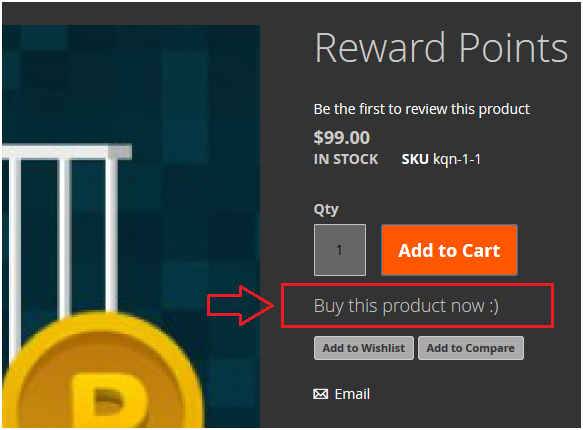
Let me take an example of customizing a html containing the text “Buy this product now” under the button “Add to Cart”
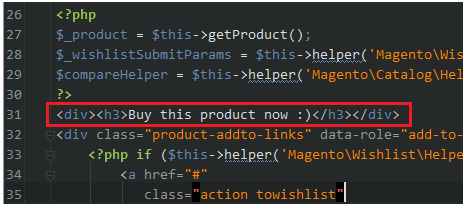
Go to app/design/frontend/Magento/magestore/Magento_Catalog/templates/product/view/addto.phtml:31, edit as follows:
Above is a simple Magento 2 theme tutorial with the step by step guide, which helps you to create Magento 2 theme in an easier way. I hope that after this series, you guys can create and customize Magento 2 theme fluently!
Share to learn
That’s all about elements you should know before going to create Magento 2 theme. Do you have any questions? Leave your comment below and I will try to help you.
[yellowbox]Don’t stay still but stay ahead by following updates & tutorials about Magento 2. Subscribe to our blog so that you don’t miss any pieces of useful information you concern.[/yellowbox]Access to full PDF version here. Remember to write a note about the next tutorial of this topic 🙂
Test more here!
Some our Magento extensions: Magento Plugin Development Magento Affiliate Plugin Magento Affiliate,





14 Comments
Hi. When I edit any variable (e.g. @color-background-page) at app/design/frontend/Magento/luma/web/css/source/lib/variables.less nothing is happens. I run “grunt less” but output has:
“Running “less:luma” (less) task
>> Destination pub/static/frontend/Magento/luma/en_US/css/styles-m.css not written because no source files were found.
>> Destination pub/static/frontend/Magento/luma/en_US/css/styles-l.css not written because no source files were found.”
How I can recompile less files?
Hi John,
For your question, you can import less file by yourself. In this post, I also mentioned about importing my-theme.less, in which I could write css or less code. To view the interface after you finish editing css code, you have to delete files in pub/static/frontend/Magento/luma/en_US/css/, remove cache by deleting var/cache folder, then you can refresh the browser to see the result.
Hope that you can do it successfully. If you still wonder about any problems, let me know then.
i have the same problem.have you resolved?
Did you forget “grunt exec” ?
Thanks for sharing the tutorial of the process to create the theme in Magento. It is the best eCommerce software and platform trusted by the world’s leading brands. I am also using the Magento theme for my e-commerce website form last 3 years with over 2000+ products and it is running prefect.
Hello.
Is this really for Magento 2?
I have downloaded last version and structure is not the way as you mention here. For example, app/design/frontend/Magento is empty.
The site is configured with the default theme “luma” and it work, but I need to change “luma” to be my own one, however, your tutorial is not useful for last Magento version.
Regards
Jaime
Did the folder “app/code/Magento/Catalog/” changed to “vendor/magento/module-catalog/”? Are these folders same? Why is this change?
Hi, thanks for the great tutorial. I seem to have a hard time overriding the layout files correct. I want to remove some blocks. For instance, I would like to remove coupon and estimated shipping on cart page. I try on checkout_cart_index.xml, but this seem not to be working, could you help we in the right direction ?
i generally use firebug to sort out which CSS file i need to edit – fire bug always points to pub/static/ files – do i understand I should not be changing that file but to edit frontend/Magento/luma/web/css, is that correct?
Thanks for sharing this good article. Perfect A to Z guide regarding Magento 2 Theme!! It helps a lot to me and it will also helps to other Magento 2 developers in future. Thank you once again.
Thanks your information, great sharing with I would like customize own theme with highly customization with mega menu (image/text [sub category]…brand slider …
Thank you for the tutorial. I want to build a custom theme for my Magento site, it’s really good to see your tutorial here
Brian
i want to change default html structure with new design at magento2 i made changes at 1 column.xml and also at empty.xml at my theme app\design\frontend\Magento\govmint\Magento_Theme\layout .
At default.xml block give its references to container so if i want to change container class and htmltags then where i have to do and where i have to put those file . please help me out with this .
Nice Article theme development can help you with how your e-store will look like developing a good theme can lead up to a high conversion rate. Not only that but also make UI attractive.