
Hi friends. Do you remember that two previous weeks we have introduced how to setup payment methods in Magento in lesson 26? It gives you understanding about how payment methods in Magento, which prepares for today’s lesson: Magento Paypal Setup.
If you want to know how to set up and configure Paypal in Magento 2, you should read Magento 2 PayPal Setup.
PayPal is a global leader in online payments which is famous for being fast and secure. With PayPal and Magento, you can accept payments from all major debit and credit cards, and PayPal account holders. Since customers don’t even need a PayPal account to pay with PayPal, both you and your customers can get extra convenience without extra effort. This lesson will guide you through a deep method to configure PayPal in Magento.
So in this Magento Tutorial lesson of Magento PayPal Setup, we will introduce to you:
- Configure Your PayPal in Magento PayPal Setup.
- Add new row to PayPal line items in Magento.
Configure PayPal in Magento PayPal Setup
To configure PayPal for your Magento store:
In the Magento Admin Panel, choose System => Configuration. Select the Payment Methods tab on the left. You’ll see the following options:
1.1. PayPal All-in-One Solutions
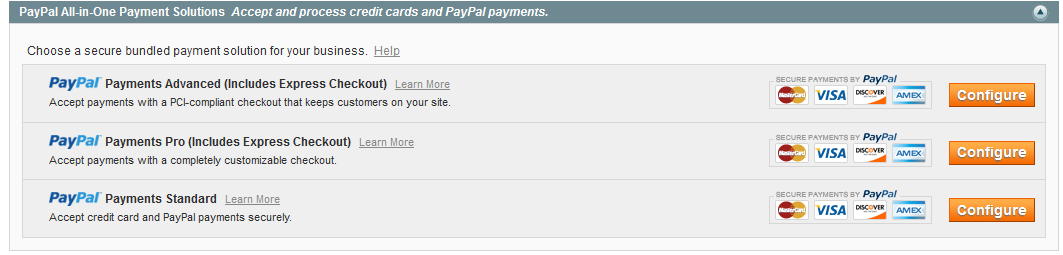
PayPal offers a variety of PCI-compliant solutions in Magento to meet the needs of your growing business. For information about the first Magento PayPal Setup – PayPal all-in-one solutions for Magento Community Edition 1.7.0.2, including detailed step-by-step setup instructions, see the following topics:
- PayPal Payments Advanced – includes Express Checkout: PayPal Payments Advanced offers your customers a secure checkout experience without leaving your site. Flexible templates and a low monthly fee make this an ideal choice for merchants who want to create a more customized checkout experience.
- PayPal Payments Pro – includes Express Checkout: PayPal Payments Pro brings you all the benefits of a merchant account and payment gateway in one, plus the ability to create your own, fully customized checkout experience.
- PayPal Payments Standard: PayPal Payments Standard is the easiest way to accept payments online. You can offer your customers the convenience of payment by credit card and PayPal by simply adding a checkout button to your site. During checkout, customers are redirected to PayPal to complete the payment part of the checkout process. There are no lengthy applications to complete, or monthly charges to set up in advance. When you make your first sale, PayPal will guide you through the process of setting up your account.
1.2. Paypal Payment Gateways

Payflow Pro Gateway
This Magento PayPal Setup is great because Customers using this payment method do not need to have a customer account with PayPal. Credit card information is entered during the checkout process. After the order is placed, the PayPal payment system processes credit card payments through the Payflow Pro Gateway.
The Payflow Pro Gateway payment method, also known as VeriSign, is only applied in the United States, the United Kingdom, Australia, and New Zealand.
The merchant needs to have a Payflow Pro account with PayPal to set up the connection to the payment system. The account information provided during registration must be entered in the Api/Integration field group. For more information about the Api/Integration parameters, refer to the Setting Up API Integration section of this article.
The allowed credit card types for the Website Payments Pro Payflow Edition payment method are American Express, Visa, MasterCard, Discover, and JCB. American Express cards require signing an additional agreement. You can learn more at http://www.paypal.com/amexupdate.
Payflow Link Gateway
PayPal Payflow Link is a hosted payment gateway solution with an embedded checkout that keeps customers on your site. It’s the fast and easy way to add transaction processing to your site.
| Bonus: Download a free guide that will show you 21-point Magento 2 Pre launch checklist. |
|---|
1.3. Paypal Express Checkout

With this payment method enabled, the [Checkout with PayPal] button becomes available on the product view pages, in the shopping cart, and in the mini shopping cart. Clicking the button allows the customer to review the shopping cart price information on the PayPal site. To use this method of payment, the customer needs to log on to his or her customer account in PayPal. The payment system uses the customer’s billing and shipping information taken from the customer’s PayPal account. The customer can then continue and will be redirected to the Magento Review Order page. After placing the order in Magento, the payment information is submitted to PayPal and the payment transaction is settled there.
If the customer does not use the express checkout button, the payment information is submitted to PayPal after an order is placed. The Express Checkout payment method can be used stand-alone; if the API credentials are not specified, the payment method is used in the unilateral mode. With the Express Checkout payment method enabled, make sure that the API Username, API Password, and API Signature fields are populated; otherwise, the payment method will work in the unilateral mode.
Express Checkout is automatically disabled if the Website Payments Pro Payflow Edition payment method is enabled.
The Express Checkout payment method is applied in all countries from the PayPal Worldwide reference list.
Some Configuration fields for Setting Up Paypal Payment Method in Magento PayPal Setup:
- Email Associated with PayPal Merchant Account – Enter the email address that was used when registering a merchant account with PayPal. If not yet registered with PayPal, simply enter your email address. If the Email Associated with PayPal Merchant Account field is empty, the Website Payments Standard payment method will be unavailable and the Express Checkout method is only available if the API credentials are specified. Instant Payment Notifications (IPNs) from PayPal are not available if the email address for sending IPNs and the one specified in the Merchant Account configuration are different.
- Set API Authentication Methods to one of the following:
- API Signature
- API Certificate
- In the API Username, API Password, and API Signature fields, enter the API username, password, and signature provided by the PayPal payment system. API credentials can be located by clicking the API Credentials link in your PayPal merchant account.
- Click the [Get Credentials from PayPal] button to be redirected to the PayPal site where you can get the API credentials for your merchant account. When in dev and testing phases, click the Sandbox Credentials button in your PayPal account to log on to your sandbox test account, and click the API Credentials link to acquire the necessary information.
- Sandbox Mode – Indicate if you’re in test or production mode for the PayPal payment system merchant account. The Sandbox mode helps testing the integration of Magento with the PayPal payment system. Transactions that are submitted while the account is in the Sandbox mode are not actually submitted to the credit card and electronic check processing networks, and credit card or bank accounts are not actually charged. Therefore, they do not have a valid transaction ID. Once you’ve finished testing the integration and website, the sandbox mode must be turned off.
- API Uses Proxy – Indicate whether a proxy server will be used for establishing the connection between your Magento store and the PayPal payment system. This is used if the server has a firewall, and there’s no direct access to the PayPal server. You can use a third party server to relay the traffic.
- If you select Yes, two additional fields for specifying the proxy host and port become available. In the Proxy Host and Proxy Port fields, specify the address of the proxy server and its port number to establish the connection between Magento and the PayPal payment system.
- Title – Enter the name of the payment method that will be displayed to the customer in the Payment Information section of the shopping cart Checkout page. This parameter can be set up for each store view. We recommend that you use the PayPal value in the Title field for each store view.
- Sort Order – When you use several payment methods, in the Sort Order field determine the order this method will be displayed in the Payment Information section of the shopping cart Checkout page in the frontend.
- Payment Action – Choose the way payments will be authorized in the PayPal payment system and the entities that will be created in the backend as a result of the payment procedure. The following options are available:
- Authorization – payments are only authorized at the side of the PayPal system and only an order is created in the backend of your store. The store administrator needs log to on to the merchant account on the PayPal site and capture the transaction.
- Sale- a payment is authorized and captured at PayPal’s side and as a result an order and an invoice are created in the backend of your store.
- Shortcut on Shopping Cart – Choose whether the customer can use the express checkout button on the shopping cart page and in the mini shopping cart. Clicking the button redirects the customer to the PayPal site where the shopping cart price information can be reviewed. If the parameter is set to No, the express checkout button on the product page still remains available.
- Shortcut on Product View – Choose whether the express checkout button is available on the product view page.
- Partner: Your PayPal Partner ID.
- Vendor: Your PayPal user login name.
- User: The ID of an additional user set up on your PayPal account.
- Password: Enter the Password that is associated with your PayPal business account.
- Test Mode: Set Test Mode to “Yes.”
When you are ready to “go live” with this solution, return to the configuration and set Test Mode to “No.” - Use Proxy: Set Use Proxy to “Yes” if a proxy server will be used for establishing the connection between your Magento store and the PayPal payment system. This is used if the server has a firewall, and there’s no direct access to the PayPal server. You can use a third-party server to relay the traffic.
If you select Yes, two additional fields for specifying the proxy host and port become available. In the Proxy Host and Proxy Port fields, specify the address of the proxy server and its port number to establish the connection between Magento and the PayPal payment system.
Add new row to PayPal line items in Magento PayPal Setup
I have created a custom module to give some discount fees for customers. I have refered this link to create a custom module for customer fees discounts.
In this case when customers have their own discount points, they will apply the discount points in cart page to reduce the Sub Total and Grand Total. The Changes works fine in cart and checkout page and etc.
My issue is that Order Sub Total and Grand Total do not reflect in Paypal Payment Gateway Line Items.
So I wrote the Event Observer to subtract the discount fees with Sub total and Add new row to paypal line items.
Use the following code to add new line for discount fees and Sub Total deduction
<events>
<paypal_prepare_line_items>
<observers>
<lesson27>
<type>singleton</type>
<class>lesson27/observer</class>
<method>prepareItems</method>
</lesson27>
</observers>
</paypal_prepare_line_items>
</events>
And Observer Code is:
<?php</p>
<p style="text-align: left;">class Magestore_Lesson27_Model_Observer extends Mage_Core_Model_Abstract
{
public function paypalPrepareItems($observer) {
$paypalCart = $observer->getEvent()->getPaypalCart();
if ($paypalCart) {
$salesEntity = $paypalCart->getSalesEntity();
$totalDiscount = 0;
if ($salesEntity->getCustomDiscount ())
$totalDiscount = $salesEntity->getCustomDiscount();
else
foreach ($salesEntity->getAddressesCollection() as $address)
if ($address->getCustomDiscount())
$totalDiscount = $address->getCustomDiscount();
if ($totalDiscount)
$paypalCart->updateTotal(Mage_Paypal_Model_Cart::TOTAL_DISCOUNT, abs((float) $totalDiscount), Mage::helper('sales')->__(Custom Discount'));
}
}</p>
<p style="text-align: left;">}
In Paypal page:

That’s all about the lesson 27 with the topic Magento Paypal Setup. You can find more Magento Tutorial from this tag Magento Open Course. Thank you!


