Howdy friends! Welcome back to our Magento Open Course today. We hope that you have practiced fluently with Grids on Magento frontend in the previous lesson.
In this Magento Tutorial lesson, we are going to bring you knowledge of Magento form on frontend, which is very common in Magento usage. The lesson is divided into 4 sections for about 3 hours.
There are 4 main parts to Customize Magento Form on Frontend:
- Steps to create a Magento form on frontend
- HTML structure of a normal Magento form
- How to name a class and create validate fields for one Magento form
- Data processing after form creation
Let’s begin!
1. Steps to create a Magento form
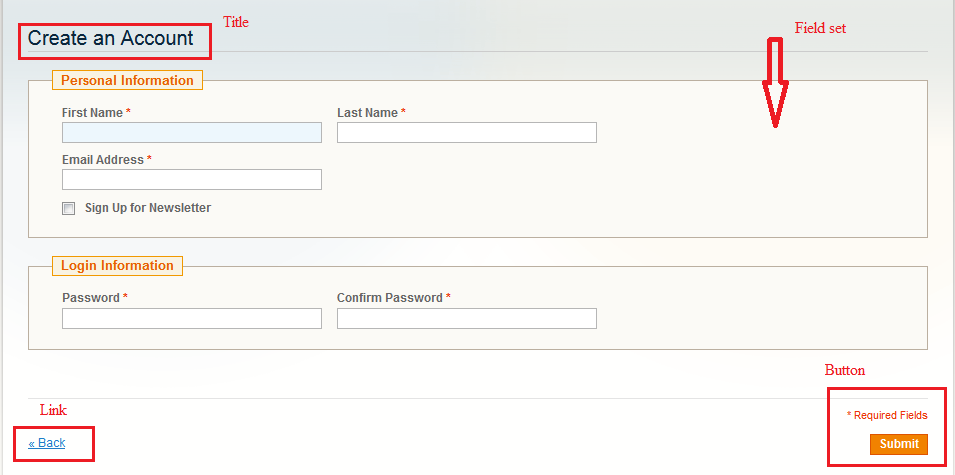
In this lesson, I would like to introduce to you how to create a Magento form on frontend. Here is the example of Account registration form:
As you can see, a form with Magento standard often consists of 3 main parts:
- Form title
- Field set with blocks of information inside
- Button & Link
In lesson 13, you are already familiar with how to build a grid on Magento frontend. However, data extracted to grid is data queried from database (SQL). That is why I will guide you how to create a form to store that information in a database. Specifically, we will work with module Lesson 14.
- Firstly, we build a database Lesson 14 with these fields:
- person_id (Key): int
- name: varchar(255)
- birthday: date
- gender: varchar(255)
- address: varchar(255)
And then we create models to process data from this database. The configuration of these models was introduced in Lesson 5. In this lesson, Model working with Lesson 14 database is app/code/local/Magestore/Lesson14/Model/Lesson14.php
- Secondly, we configure controller/Action in layout file: app/design/frontend/default/default/layout/lesson14.xm
<layout version="0.1.0">
<lesson14_index_index>
<reference name="root">
<action method="setTemplate"><template>page/2columns-left.phtml</template></action>
</reference>
<reference name="content">
<block type="lesson14/lesson14" name="lesson14" template="lesson14/lesson14.phtml" />
</reference>
</lesson14_index_index>
</layout>
- Thirdly, create a file block: app/code/local/Magestore/Lesson14/Block/Lesson14/php
class Magestore_Lesson14_Block_Lesson14 extends Mage_Core_Block_Template
{
public function getActionOfForm()
{
return $this->getUrl('lesson14/index/createPerson);
}
}
- Finally, create a file template: app/design/frontend/default/default/template/lesson14.phtml
<!--Form Tittle-->
<div class="page-title">
<h2><?php echo $this->__('Lesson14 Create Person') ?></h2>
</div>
<!--Form Information-->
<form id="person-form-validate" method="post" action="<?php echo $this->getActionOfForm()?>">
<div class="fieldset">
<h2 class="legend"><?php echo $this->__('Person Information')?></h2>
<ul class="form-list">
<li class="fields">
<div class="customer-name">
<div class="field name-firstname">
<label class="required" for="firstname"><em>*</em><?php echo $this->__('Name')?></label>
<div class="input-box">
<input type="text" class="input-text required-entry" maxlength="255" title="Name" value="" name="name" id="name">
</div>
</div>
<div class="field birthday">
<label class="required" for="birthday"><em>*</em><?php echo $this->__('Birthday')?></label>
<div class="input-box">
<input type="text" class="input-text required-entry" maxlength="255" title="Birthday" value="" name="birthday" id="birthday">
</div>
</div>
</div>
</li>
<li class="fields">
<div class="gender">
<div class="field gender">
<label class="required" for="gender"><em>*</em><?php echo $this->__('Gender')?></label>
<div class="input-box">
<input type="text" class="input-text required-entry" maxlength="255" title="Gender" value="" name="gender" id="gender">
</div>
</div>
<div class="field address">
<label class="required" for="address"><em>*</em><?php echo $this->__('Address')?></label>
<div class="input-box">
<input type="text" class="input-text required-entry" maxlength="255" title="Address" value="" name="address" id="address">
</div>
</div>
</div>
</li>
</ul>
</div>
<!--Button & Link-->
<div class="buttons-set">
<p class="required">* <?php echo $this->__('Required Fields')?></p>
<p class="back-link"><a class="back-link" href="<?php echo $this->getBaseUrl();?>"><small>«</small>Back</a></p>
<button class="button" title="Submit" type="submit"><span><span><?php echo $this->__('Submit')?></span></span></button>
</div>
</form>
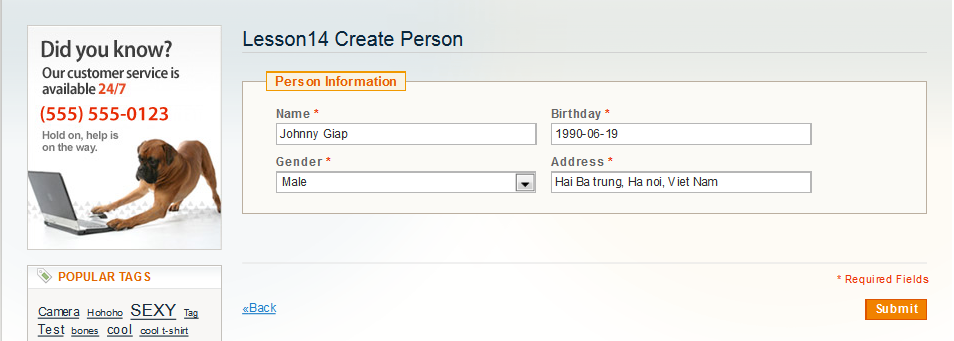
The result will be:
| And this is a bonus: Download a free guide that will show you 21-point Magento 2 Pre launch checklist. |
|---|
2. HTML structure of a normal Magento form
A Magento form usually contains default classes (in layout). The above example has shown you a form with Magento standard:
- Beside the form tag is the method and action tag
- Inside the form, we often observe class fieldset to classify groups with different information (for example in the registration form, there are 2 fieldsets: personal information & login information)
- Class legend is used to name Fieldset
- Next is the form-list classes, and smaller is fields class containing the fields in the fieldset.
- Fields often contains label, input HTML tags…
3. How to name class and create validate fields for a Magento form
In addition to help process interface support, Magento has many JavaScript functions which form required fields in forms, email fields, checkbox button, radio button and so on.
To use them, we need to declare a form object with a JavaScript function written in template file which contains form. This function has structure as follows:
var dataForm = new VarienForm(form-id',true);
Form-id is the id of the form we want to declare. Apply this to the example: app/design/frontend/default/default/template/lesson14.phtml
<script type="text/javascript">
//<![CDATA[
var dataForm = new VarienForm('person-form-validate', true);
//]]>
</script>
After the form is declared, all fields in the form are checked automatically by Magento’s available JS functions. They are written in the file: js/varien/form.js.
Fields in checked range must have valid class names. Below I will introduce you a list of class names:
|
Validate Class Name |
Invalid messages |
| validate-select | Please select an option. |
| required-entry | This is a required field. |
| validate-number | Please enter a valid number in this field. |
| validate-digits | Please use numbers only in this field. Please avoid spaces or other characters such as dots or commas. |
| validate-alpha | Please use letters only (a-z or A-Z) in this field. |
| validate-code | Please use only letters (a-z), numbers (0-9) or underscore (_) in this field, first character should be a letter. |
| validate-alphanum | Please use only letters (a-z or A-Z) or numbers (0-9) only in this field. No spaces or other characters are allowed. |
| validate-street | Please use only letters (a-z or A-Z) or numbers (0-9) or spaces and # only in this field. |
| validate-phoneStrict | Please enter a valid phone number. For example (123) 456-7890 or 123-456-7890. |
| validate-phoneLax | Please enter a valid phone number. For example (123) 456-7890 or 123-456-7890. |
| validate-fax | Please enter a valid fax number. For example (123) 456-7890 or 123-456-7890. |
| validate-date | Please enter a valid date. |
| validate-email | Please enter a valid email address. For example johndoe@domain.com. |
| validate-emailSender | Please use only letters (a-z or A-Z), numbers (0-9) , underscore(_) or spaces in this field. |
| validate-password | Please enter 6 or more characters. Leading or trailing spaces will be ignored. |
| validate-admin-password | Please enter 7 or more characters. Password should contain both numeric and alphabetic characters. |
| validate-cpassword | Please make sure your passwords match. |
| validate-url | Please enter a valid URL. http:// is required |
| validate-clean-url | Please enter a valid URL. For example http://www.example.com or www.example.com |
| validate-identifier | Please enter a valid Identifier. For example example-page, example-page.html or anotherlevel/example-page |
| validate-xml-identifier | Please enter a valid XML-identifier. For example something_1, block5, id-4 |
| validate-ssn | Please enter a valid social security number. For example 123-45-6789. |
| validate-zip | Please enter a valid zip code. For example 90602 or 90602-1234. |
| validate-date-au | Please use this date format: dd/mm/yyyy. For example 17/03/2006 for the 17th of March, 2006. |
| validate-currency-dollar | Please enter a valid $ amount. For example $100.00. |
| validate-one-required | Please select one of the above options. |
| validate-one-required-by-name | Please select one of the options. |
| validate-not-negative-number | Please enter a valid number in this field. |
| validate-state | Please select State/Province. |
| validate-new-password | Please enter 6 or more characters. Leading or trailing spaces will be ignored. |
| validate-greater-than-zero | Please enter a number greater than 0 in this field. |
| validate-zero-or-greater | Please enter a number 0 or greater in this field. |
| validate-cc-number | Please enter a valid credit card number. |
| validate-cc-type | Credit card number doesn\’t match credit card type |
| validate-cc-type-select | Card type doesn\’t match credit card number |
| validate-cc-exp | Incorrect credit card expiration date |
| validate-cc-cvn | Please enter a valid credit card verification number. |
| validate-data | Please use only letters (a-z or A-Z), numbers (0-9) or underscore (_) in this field, first character should be a letter. |
| validate-css-length | Please input a valid CSS-length. For example 100px or 77pt or 20em or .5ex or 50% |
| validate-length | Maximum length exceeded. |
In the example of module in lesson 14, we use two types of validate class: required-entry and validate-date. Below is a complete code block in the template file:
app/design/frontend/default/default/template/lesson14.phtml
<!--Form Tittle-->
<div class="page-title">
<h2><?php echo $this->__('Lesson14 Create Person') ?></h2>
</div>
<!--Form Information-->
<form id="person-form-validate" method="post" action="<?php echo $this->getActionOfForm()?>">
<div class="fieldset">
<h2 class="legend"><?php echo $this->__('Person Information')?></h2>
<ul class="form-list">
<li class="fields">
<div class="customer-name">
<div class="field name-firstname">
<label class="required" for="firstname"><em>*</em><?php echo $this->__('Name')?></label>
<div class="input-box">
<input type="text" class="input-text required-entry" maxlength="255" title="Name" value="" name="name" id="name">
</div>
</div>
<div class="field birthday">
<label class="required" for="birthday"><em>*</em><?php echo $this->__('Birthday')?></label>
<div class="input-box">
<input type="text" class="input-text required-entry validate-date" maxlength="255" title="Birthday" value="" name="birthday" id="birthday">
</div>
</div>
</div>
</li>
<li class="fields">
<div class="gender">
<div class="field gender">
<label class="required" for="gender"><em>*</em><?php echo $this->__('Gender')?></label>
<div class="input-box">
<select type="text" class="input-text required-entry" title="Gender" name="gender" id="gender">
<option value=""><?php echo $this->__('--Please Select--')?></option>
<option value="Male"><?php echo $this->__('Male')?></option>
<option value="Female"><?php echo $this->__('Female')?></option>
</select>
</div>
</div>
<div class="field address">
<label class="required" for="address"><em>*</em><?php echo $this->__('Address')?></label>
<div class="input-box">
<input type="text" class="input-text required-entry" maxlength="255" title="Address" value="" name="address" id="address">
</div>
</div>
</div>
</li>
</ul>
</div>
<!--Button & Link-->
<div class="buttons-set">
<p class="required">* <?php echo $this->__('Required Fields')?></p>
<p class="back-link"><a class="back-link" href="<?php echo $this->getBaseUrl();?>"><small>«</small>Back</a></p>
<button class="button" title="Submit" type="submit"><span><span><?php echo $this->__('Submit')?></span></span></button>
</div>
</form>
<script type="text/javascript">
//<![CDATA[
var dataForm = new VarienForm('person-form-validate', true);
//]]>
</script>
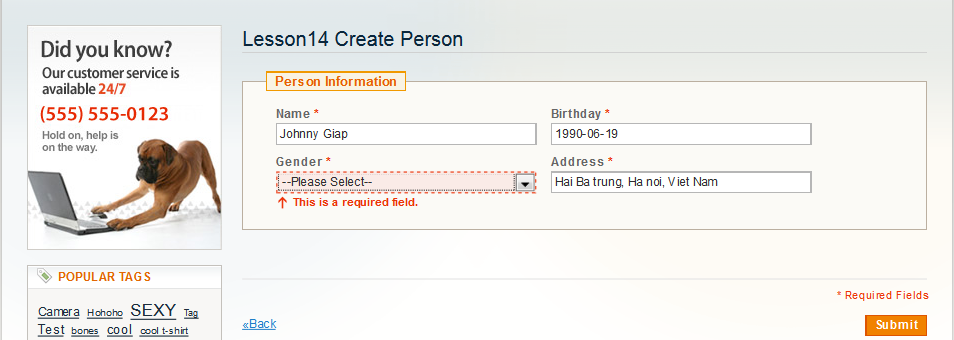
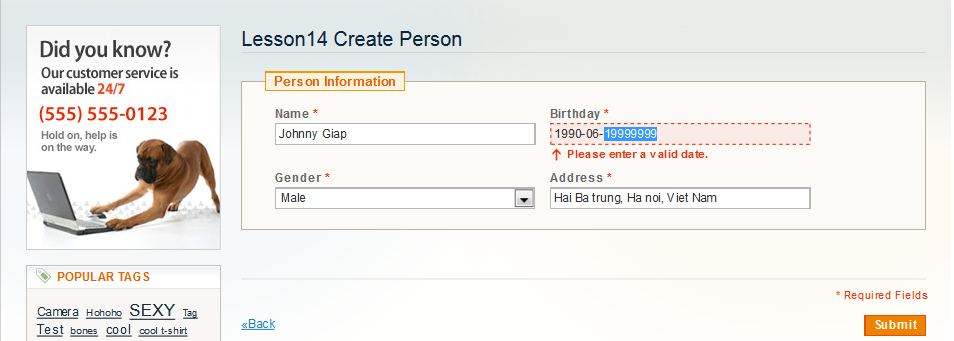
This is the result shown after you click Submit:
When required fields are not completed
When date format is not correct
When all fields are full and correct
4. How to process data after creating article
After creating a Magento form, the next step is to process data in the form.
In this case, we want to save information into table lesson 14 via the form. To do that, we would create a controller to process the Magento form. It is noted that you should name input-boxes similar to fields in database you want to save so that you can edit database with convenience later.
app/code/local/Magestore/Lesson14/controllers/IndexController.php
public function createPersonAction()
{
$data = $this->getRequest()->getPost();
$session = Mage::getSingleton('core/session');
$person = Mage::getModel('lesson14/lesson14');
$person->setData('name', $data['name']);
$person->setData('birthday', $data['birthday']);
$person->setData('gender', $data['gender']);
$person->setData('address', $data['address']);
// $person->setData($data);
try{
$person->save();
$session->addSuccess('Add a person sucessfully');
}catch(Exception $e){
$session->addError('Add Error');
}
$this->_redirect('lesson14/index/index');
After participating in two parts of lesson 14, you should know overview of Magento form on frontend, how to create a basic Magento form outside the frontend, how to use validate field in Magento form, and how to handle data after submitting form.
Practice and wait for the next lesson!
We will update our Magento tutorial center regularly, especially about Magento 2. Let’s subscribe to our blog to be the first one catch up with the latest news by leaving your email below.
Enjoy coding and see you later. Follow us in Magento Open Course for Magento Tutorial.


4 Comments
Screen is not displaying
thanks for the tutorial…
Thank you, syed
Really informative …